Friday 25 November 2011

Optical Devices

Today we where looking at different optical illusions on this cool website. There where 12 optical toys in total, from Laura Hayes and John Howard Wileman's Exhibit of Optical Toys. These toys are old school optical illusion. I thought they where very interesting and had great information. It includes each toy along with it's History,Function and what became of it. Check it out!


Each toy was very fascinating, although my favorite would have to be the Thaumatrope. The Thaumatrope is basically a small disc with an illustration on each of this sides . There is a string tide on each of the opposite sides of the disc. When you spin it, the two images on each side will appear to be one.

Wednesday 23 November 2011

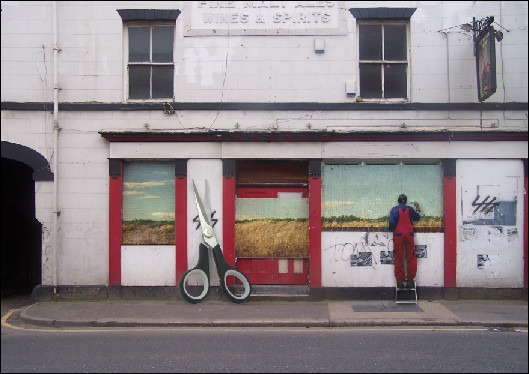
Fascinating Photoshop Tutorial

Our task was to find an interesting tutorial for Photoshop. After looking through a bunch of tutorials, I came across this one. I found it super cool and easy to follow. I liked it because they plays with the size of the different pictures and manipulated them.

The scissors in the end product look very real/lifelike and don't look like they where just pasted in. It's kind of like there are a very large pair of scissors leaning onto the wall. Also The painting on the wall  and painter actually look like they are present there.


There are also a lot more cool tutorial's on this website. Enjoy :)

Wednesday 16 November 2011

Photoshop Trial

SWINTER!


 Before even starting I had to think of an idea for my surrealist picture. My picture is about winter and summer combining and merging to one. I thought about combining summer and winter because they are the two most opposite seasons. 

 First I opened an 8.5 x 11inch canvas in Photoshop CS4 so my picture would not turn out too small. Then I found a picture of a beach and set it as my base layer. After I made a new layer and added a picture of a snowman. I had to take the background out using the Lasso Tool and Polygonal Lasso Tool. Then used the same steps but put a picture of snowballs beside the snowman.  

 To make the snowman look more real, I used the Paintbrush Tool to colour the bottom of the snowman a yellow/beige to blend more with the sand on a different layer and made the opacity lower. At the end I changed the Brightness and Contrast to touch it up.

Monday 7 November 2011

Presentation on Surrealism

This is my PREZI  Presentation on Surrealism.  The artist I chose was RenĂ© Magritte!
CHECK IT OUT! :)

Thursday 3 November 2011

My Chess Piece- The King


  This is one of the assignments we got in CyberARTS. My drawing is of the king chess piece. Our goal in this assignment was to draw the chess pieces as realistic as possible. Also we had to focus on value, proportion, and shadows. The background had to have pattern and movement.

  I started off by drawing my chess piece. It is not completely in the center of the paper, but closer to the bottom and slightly to the left of the page. The king was at eye level. First I drew the king without shading and then got into detail. After drawing it, I used a light shining from left to right. The lights made it easier to shade it in showing value. The pencils I used where HB, 2B for lighter to 6B for darker parts. 

  The pattern I used for the background where 3 metal bar looking objects going diagonal across the page. This moves your eyes to follow the shapes. I used similar shading/value as I did for the middle of the chess piece.